Friday, December 30, 2016

More Rustic Roots Cowls


Recipe is included in yesterday's post

These are the last of the gift cowls. But they are far from the last of the ones I will make. 

I am showing all of these, because the yarns are just so danged gorgeous. And I love the idea that all but one of these has supported a local farm and dyer. 

The recipe for the ribbing remains the same. 


This colorway is County Fair. 

It reminds me of all the lights at our small town local fair. 

It has always been a favorite thing to attend. For the fun, the music, AND the exhibits and competition items in that arena. And the 4H and FFA animals as well. 


For this one I used what I call a Pebble Stitch. It is nothing but alternating SC then DC worked in the round. Every now and then I would have to complete two of the same stitch to keep the texture "nesting right"

When I do these stitches I want a DC in the top of the previous row SC - hope that makes sense. 

These are cowls, they will be bunched around your neck, you will never notice those paired stitches. 

I am talking MINDLESS crochet here. I did most of these in the car, in the deer stand, or by the campfire. 


Exactly the same pattern but this colorway I called Wine Harvest.


These are such beautiful colors.


This is the same texture stitch - I did a few less ribs on the top so it fits a bit closer.

This color not as dulled as it appears --- horrid lighting for this one. 
The color is much better in the modeled shot you will see later in this post. 

Now for my favorite...


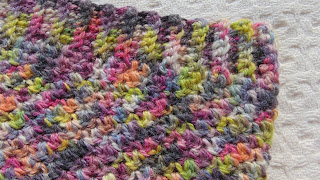
I learned this stitch in the process of making these cowls. This is actually the back side and it really does look knitted. And it is such an easy stitch to do. 

It is a variation on the half double crochet (US term) and it gives a stockinette looking stitch on one side and this stunning texture on the other --- will use this a LOT. 


The photo above shows what most people would call the "right side" flipped up, But in the cowl application this is fully reversible. 

The red yarn is by DREAMS IN COLOR YARN and the color is called Lipstick Lava. 

This yarn is fabulously soft too. 

Again I used fewer ribbing rows and the nature of the stitch pulls the fabric in a bit, so this and the next one are a closer and taller fit on the cowl.

See - I told you the recipe was foolproof. 


This last one is my favorite colorway in the rustic roots yarn. 

I called it RIVERSTONE. 

Each of these yarns is from a very small dye lot, So they are pretty much one-of-a-kind. 

This particular cowl is also the camel stitch ---- so it is reversible as well.

And you can see it did some very interesting pooling about 3 inches in. 


Just remember the ribbing is completed first and then the cowl body, So these are actually finished "upside down" 

So if the stitch look a bit funny, that's the reason.


There is the flip side of this one. 


Now - I do have one "TIP" --- these are crocheted in the round. That typically leaves an uneven spot on the ending edge. Here is how I blend it in and give a smoother presentation on the finish. 

I finish my stitching in pattern, then for three stitches, I use the next taller height, then work my way down in three or four stitch increments until I have completed three or four slip stitches in the previous row. This tapers to a smoother finish (see bottom right of above photo) 

This was 3 DC, then 3 HDC, then 3 SC, then three SS. (US TERMS) 

That may not be the PROFESSIONAL WAY, but it is my PRACTICAL way. 

Now some super pretty modeled photos. 


Abby in the Santorini Sea Cowl 
(think the iconic photos of Santorini, Greece) 

She actually chose this one as hers.


Abby in the Lipstick Lava Cowl.

She is becoming much more edgy in her clothing. I see the New York influence a lot more in her confidence and clothing. 

So proud of her moving up there and beginning her life there.


Abby in the Riverstone Cowl


Molly in the Wine Harvest Cowl.


Molly in the County Fair Cowl.

Those eyes people --- those eyes.

Molly has had a tough year and I am so happy to see the light returning to those eyes. 

There you have it. 

This years Rustic Roots Gift Cowls

Easy stitching, fabulous Yarn, Beautiful results. 


Tuesday, December 27, 2016

Rustic Roots Cowl (Recipe Included)

I bought some gorgeous local wool yarn at a trunk show. 

One skein and I fell head over heels in love with the texture. 
It's spun from Gulf Coast Native fleece and has a bit of silk blended in. 

I knew immediately these skeins would become gifts for this past Christmas. 


I decided on cowls. 

Now this is a RECIPE ---- NOT A PATTERN

I started by measuring a favorite cowl I already wear a LOT. 

I then created the ribbing. CHAIN 8 - turn - skip first chain and then 7 SC - ch 1 - turn 
7 sc in the back loop only. 

Repeat until you reach the desired length -- it was 122 rows of ribbing for me. 

Make a loop and sew the ribbing into that circle. 

I then simply  HDC in the end of each rib. 

I continued this until I had "enough yarn for a crab stitch last row. 

DONE and DONE.


This one is called Urban Camo simply because the grey/green feels like camo -- but the grey is like concrete. 

This is plain old HDC and I love the slight star effect this made while having a nice flat texture.


A close up of the border 


 My Sweet Abby modeled this one for me. 


This one I called the BLUEBERRY COBBLER one. 

It's a recipe --- after I completed the ribbing I used B.Hooked Crochet's Cowl pattern and made this one Bobble stitch 


I call this one the BLUE SPRUCE  - Made using the same bobble stitch.

I ended these using the camel stitch band. 


My oldest daughter is modeling both of these - 


There are more variations on these - but my friend asked for the recipe ----- 

It's crochet - It's how I relax - These will hopefully be used and loved. 


Monday, December 12, 2016

Kindness Quilt Square #4 -- aka my favorite one.

It only takes ONE person, and ONE act of kindness, to inspire others and create change.
@jennifer_hogan

That quote illustrates a great way to live and one thing I have discovered in the 
creative blogging community, is that they are some of the most
generous and kind people around. 

My friend Vicki, over at the 2 Bags Full blog is one of those wonderful
people.  

So when I was invited to be a part of her KINDNESS QUILT PROJECT, I was thrilled and honored to participate. An immediate "YES' was my answer. 

4 squares - crochet and embellished.

Roughly 6 inches square. 

These will be gathered by Vicki, assembled, and gifted to a special person. 

What a wonderful way to share our love of creating with others. 

I immediately went to work. 

Details from Square #4


This looks NOTHING like my original idea for the 4th square. 

It's all Cindy Kirk's fault. She gifted me this gorgeous novelty yarn.

And it screamed Sea Water to me. 

So I made the foundation for this one to resemble the sea. 

And then I wanted a tidal pool with all kinds of treasures.

A base of some sand colored linen.

 I edged it with some rough thread bordering. 

I did the border in single crochet and left the loops and bobbles free to simulate the splash of waves on the sand. 

Sew on some clear bead "bubbles".


Then I ran across these seashell patterns 
Designed by Susan Whitlock. 

I made mine from bedspread cotton. 
I LOVE IT. 

I also crocheted a little spiral of seaweed. 

Gathered fun little bits and bobbles to embellish this.

Look there's a lace "sand dollar" 

And a crocheted bit of a "sea fan coral"


This project was so much fun. 

Having an idea.

Seeing the idea come to life as I worked on it. 


There's the full view of my "Mermaid's treasure, tidal pool"

Thank you Vicki for inviting me to be a part of this. 

I cannot wait to see the finished quilt. 

Thursday, December 08, 2016

Kindness Quilt Square #3

It only takes ONE person, and ONE act of kindness, to inspire others and create change.
@jennifer_hogan

That quote illustrates a great way to live and one thing I have discovered in the 
creative blogging community, is that they are some of the most
generous and kind people around. 

My friend Vicki, over at the 2 Bags Full blog is one of those wonderful
people.  

So when I was invited to be a part of her KINDNESS QUILT PROJECT, I was thrilled and honored to participate. An immediate "YES' was my answer. 

4 squares - crochet and embellished.

Roughly 6 inches square. 

These will be gathered by Vicki, assembled, and gifted to a special person. 

What a wonderful way to share our love of creating with others. 

I immediately went to work. 

Details from Square #3


I made the base for this one from some wool blend, sock weight yarn using a C2C pattern. 

Then I went into the stash. 

I knew I wanted to make the roses from my friend Doni's, Tutorial . I've made a lot of these in different sizes since I first got the tutorial from her, so I consider this one tried and true. 

So I gathered some cobweb weight thread in assorted colors from the stash.
I wanted this to feel like dried rose bouquets that we save from those special events. 

I crocheted six roses and added vintage buttons for the centers. 


For the "leaves" I crocheted a lacy doiley center from some nice, silky thread. The sheen and color perfectly fit the idea I was trying for. 

Then a fussy cut from some vintage lace that my friend MaryAnn sent me. 

The final bit of detail is a FAVORITE button that I have been hanging on to for YEARS. 


Look again at those colors.

Does it give you the keepsake faded roses feel I was seeking?


I promise this is square - but it sure looks wonky in this picture.

I am really happy with how this turned out. 

It is so exciting when the idea in your head really works out. 


Monday, December 05, 2016

Kindness Quilt Square #2

It only takes ONE person, and ONE act of kindness, to inspire others and create change.
@jennifer_hogan

That quote illustrates a great way to live and one thing I have discovered in the 
creative blogging community, is that they are some of the most
generous and kind people around. 

My friend Vicki, over at the 2 Bags Full blog is one of those wonderful
people.  

So when I was invited to be a part of her KINDNESS QUILT PROJECT, I was thrilled and honored to participate. An immediate "YES' was my answer. 

4 squares - crochet and embellished.

Roughly 6 inches square. 

These will be gathered by Vicki, assembled, and gifted to a special person. 

What a wonderful way to share our love of creating with others. 

I immediately went to work. 

Details from Square #2


The base is crocheted from a soft, baby sweater yarn that I had leftover from a baby blanket.
(I've also used it in a Moogly Sweater that I made) 

It matched some sweet rose fabric scrap that I had. I actually think that this is the very last bit of this fabric. 

I took some beautiful coordinating Perle Cotton and crocheted an edging around the oval rose cutout from that fabric. Giving it a "frame" effect.

A tiny PEACE advertising token from an insurance company was attached along with a vintage button and a blossom from a silk hydrangea. 


I then beaded a tiny little butterfly (or moth) and attached that as well.


I mounted the framed rose a bit off center to allow the colorful striping to be seen . 


A fairly quick and simple square. 


Friday, December 02, 2016

My Kindness Quilt Square #1

It only takes ONE person, and ONE act of kindness, to inspire others and create change.
@jennifer_hogan

That quote illustrates a great way to live and one thing I have discovered in the 
creative blogging community, is that they are some of the most
generous and kind people around. 

My friend Vicki, over at the 2 Bags Full blog is one of those wonderful
people.  

So when I was invited to be a part of her KINDNESS QUILT PROJECT, I was thrilled and honored to participate. An immediate "YES' was my answer. 

4 squares - crochet and embellished.

Roughly 6 inches square. 

These will be gathered by Vicki, assembled, and gifted to a special person. 

What a wonderful way to share our love of creating with others. 

I immediately went to work. 

Here are the details of the very first square from me. 


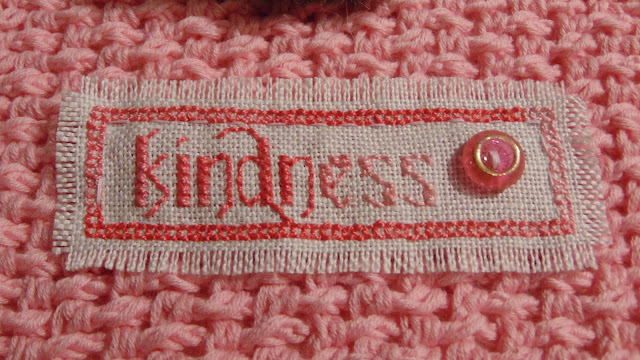
A luscious, soft, pink cotton yarn. I crocheted in a single stitch basket weave pattern. 
(Looks like an Easter basket to me.) 

Once I had the base completed, I then set about embellishing.

I have made hundreds of these melty fabric flowers over the years, (here's a HOW TO link if you like) and I had these warm pink fabrics left over from making some for a wedding, so I made one for this block. 
( Trying to be stashsourceful, so I made all four blocks from assorted stash materials.) 


The flower kind of disappeared against my base, so I crocheted a circle for the "leaves"

I went to the scrap box for a bit of linen and added a bit of cross stitch to this. 

That little glass button was gleaned from my "favorites" jar. 


I then called this one complete. 

Although, Vicki may add more embellishment to it as she assembles the entire quilt. 


Again, I am so honored to have been asked about being a contributor to this project. 

I'll be back in a few days with the next block. 

Have a fabulous weekend. 

Life is crazy beautiful