Showing posts with label design team. Show all posts

Friday, December 12, 2014

Oh Christmas Tree

Welcome to the SweetStamps.com Sweeties Holiday Blog Hop!!

With the Holidays right around the corner we thought it would be fun to share some lovely Holiday inspiration with you!

If you are arriving from Shelly's Place, welcome to MaggieGrace World.   If you haven't and would like to start at the beginning, please go back to the Sweet Stamps Blog. I promise there are lot's of great ideas and inspiration being shared. 

Be sure to leave comments along the way for your chance at winning!  We will randomly choose one winner from all the comments left!

********************************************************

I am all about easy and fun projects and this is no different than most of mine. 

Today I'm sharing a cute little Christmas Tree Ornament. (it will hang or stand)

I can see several of these across the Mantel in assorted sizes. 

The list of materials is at the bottom of the post. 


Make yourself a cone from green cardstock. I make my cones using a half circle and simply rolling into the cone shape and gluing in place. The tree part of this is about three inches tall and I cut a 5 inch circle in half to make it. 

While that is drying, Dig through your scraps (we all have those don't we) and pick several assorted green ones. (Or use strips of green papers).

Cut several of the Fancy Leaf shapes. These do not have to be complete cuts. Be sure and cut some from both directions by turning your paper over to the "wrong" side for some of the cuts. Trim just the leaves from the cuts and discard the flourishes. 

Flex the leaves a bit to give them dimension. 

Using Glastique as an adhesive, glue the leaves around the tree. Start at the bottom and let the first row hang off a bit below the edge. Move up the tree and overlap the leave all the way to the top. 
(I placed my cone over a styrofoam cone and pinned the leaves that wanted to slide off. using tiny pins and angling them under the next row area hides the holes very effectively.) 

Let this all dry over night.

Lightly mist the entire tree with spray adhesive and sprinkle with extra fine chocolate glitter.

The "star" at the top is a glitter paper cut using the Mini Flower Die. I cut it twice and used one openwork petal piece and the two solid backer bits. A tiny Pearl from the Brown Pearls kit accents the center with a bit of extra fine chocolate glitter. 

To stand this one, I glued two vintage spools together (you can buy reproductions at most any craft store) and set the tree over the stack. I glued the top one into the cone. 

See - very easy to make.

Make several and set up your own little forest of these. 

Don't forget to comment. Every comment gets added to the drawing for goodies. Also be sure to leave your email address in the comments (Blogger may or may not let me in on that information depending on your settings) 

Thanks for stopping by.

Seems I am ending this hop, I  sure hope you gathered some inspiration along the way. 

This link takes you back to the SweetStamps Blog


Check out all of Sweet Stamps "sweet" goodies here!
Happy Hopping, Happy Shopping
and...

HAPPY HOLIDAYS!


Thursday, October 16, 2014

it's a Luke Bryan song inspired box.

We all have things we want to keep. Especially memory things. This is a Memory Box. Ready for beach photos, maybe a ticket to the pavilion amusement park, even a few seashells. Every time I heard this song, I knew I wanted to use the imagery from it for a project. 


It started with a kraft paper recipe box. And this wonderful soft toned "beach- washed" wood scrapbook paper. 

To that I added the following items

From GlobeCraft and Piccolo 
- 3d Enamel Gel 
        Honey Mustard 
        Orange
        Coral Pearl  
        Satin Honeydew
- Embossing Enamel Powders
        Micro Gold 
        Cranberry Wine
        Mermaid Tears
        Temple Stone
        Starry Sky
        Mossy Glen
        Platinum
Piccolos
        Vintage Cross Accent
        At the Beach Accents


From SweetStamps
        Java Sparkle EP
        Desert Sparkle EP
        Super Sticky Tape
        Brown Pearls

I used the Sticky Tape to adhere the paper to the box. 

The orange and green flower is glued to the top only and does not interfere with opening and closing the box at all. 

I trimmed down the "sand" below the palm trees. 

This was a really fun little memory box to complete. 


The Mossy Glen is PERFECT for those palm tree fronds. I used a tiny paintbrush and the Embossing adhesive to use the different powders in these detailed accents. 

Please. If you create a project "inspired by a song" leave me a comment so I can go take a look. 

Have a wonderful Thursday --- Teresa 

Thursday, June 05, 2014

angel words


I'm over at GlobeCraft and Piccolo today with a tutorial for the canvas above.

Thursday, May 22, 2014

Thursday, May 08, 2014

Well Hello There --- haven't seen you in a while.


 I'm still kicking.

Lot's of changes in my world. 

But I do still make things. 

Actually I've been making LOTS of things.

These two are just the latest Design Team Offerings over at Globecraft and Piccolo. 

And cool news - They have asked and I have agreed to continue for the rest of the year as one of the team. 

It was very exciting to be invited back. 


I'm also requesting prayer for some things going on in my life. 

Just things. Nothing serious. But overwhelming none the less. 


In good news, the Softball Princess is busily preparing for post season play.

They have advanced into Regional play and are on the road to Nationals. 

I'll be spending LOTS of time on the road and by the field this weekend and hopefully for the next several weekends. 

Life is Beautiful.

Note - there is a tutorial for the cross and dragonfly here

Thursday, February 27, 2014

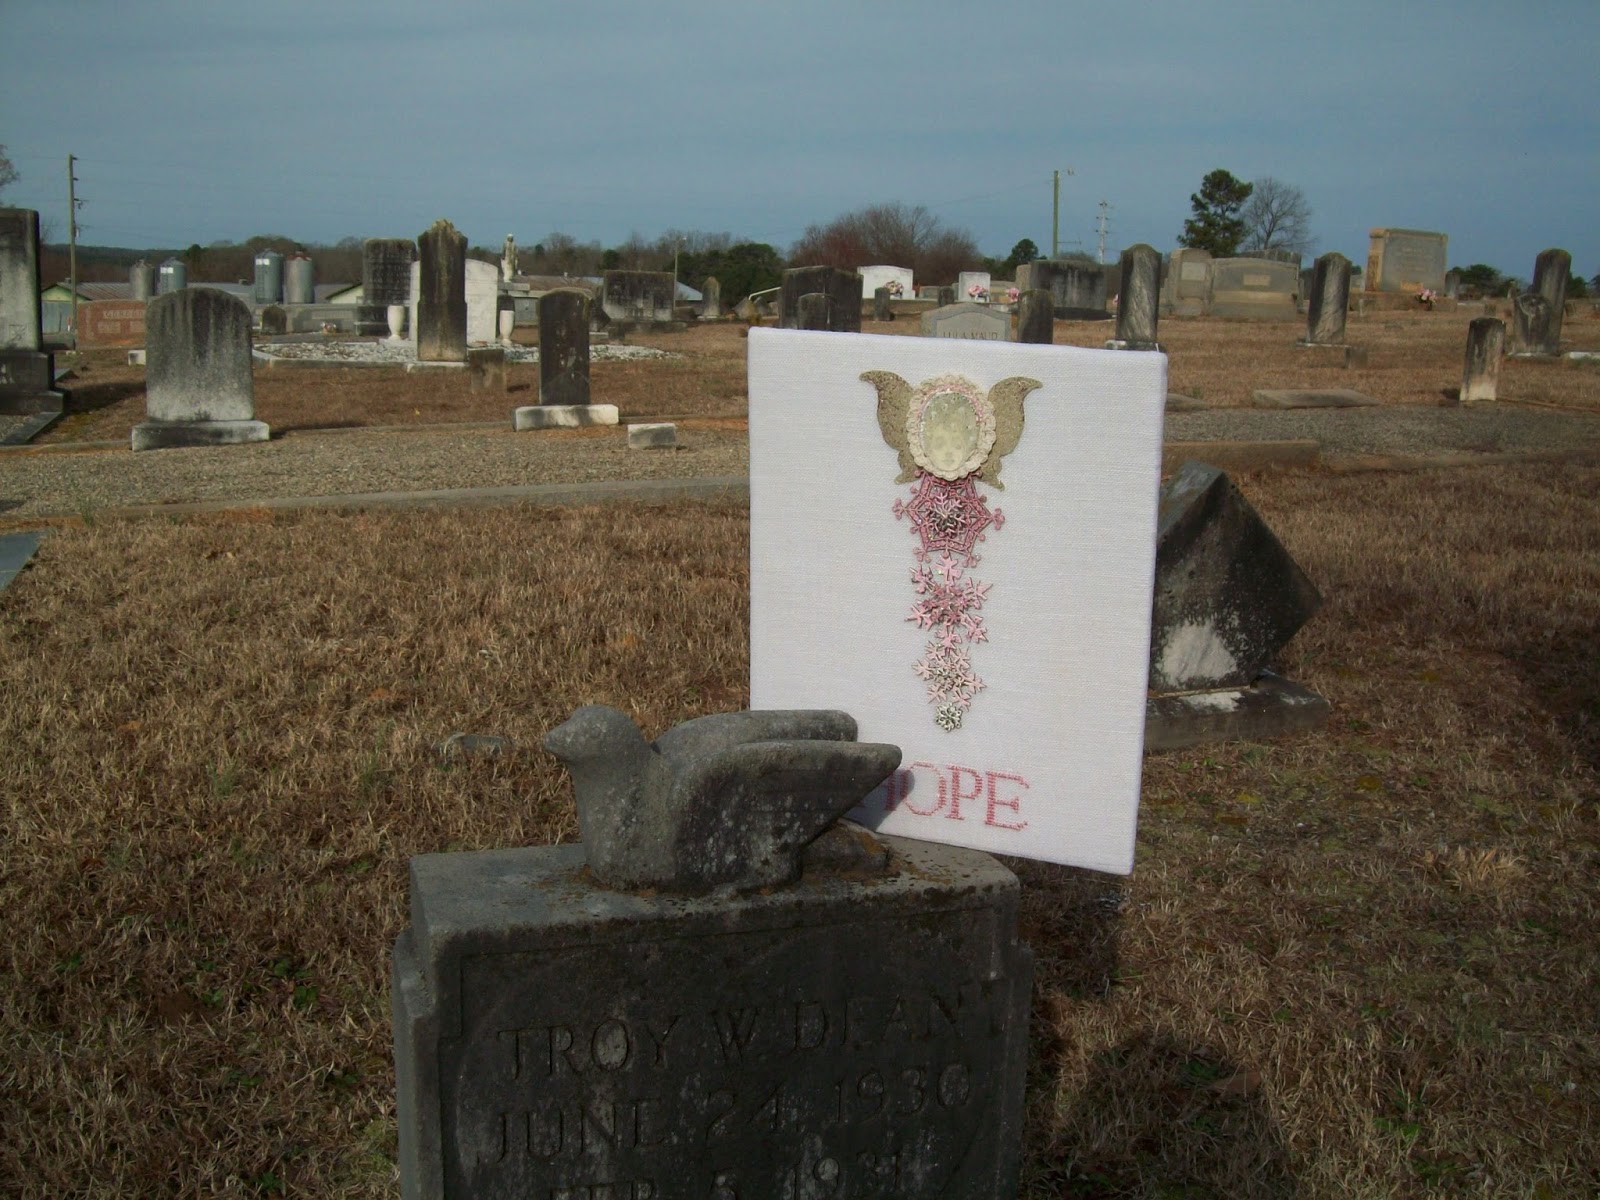
My HOPE is found


I have often expressed my Faith here. 

I am a fallen - very human - sinner.
Saved by Grace.

This is not a post about all of that.  

It is a post about is HOPE. 

Every time I think I am at the end of my rope, HOPE is there. 

It may come in the form of a smile. 

An unexpected blessing. 

Even as a stillness of peace feeling in the core of my being. 

Every single time I need HOPE, it has been delivered. 


 Photo taken in Jones Chapel UMC cemetery Danielsville, GA

I knew when I was selected for the design team, that I would try to make an angel. 

I kind of knew what she would look like. 

But even I am surprised at her. 

Wonderfully surprised. 

She's a tribute piece for so many people. 

So many thank yous that need to be said.

Over and over. 

Photo taken in Jones Chapel UMC cemetery Danielsville, GA 

Sunday morning was glorious. 

I took her out in the sunshine.

In the church cemetery, with the idea of her picture at the foot of Jesus.

Then as I strolled through the cemetery, I saw all of the children's graves.

Made me wonder about those families. 

Made me wonder if they kept their HOPE after such a horrible loss.

Wonder what HOPE for better things means to me. 

And to others. 


A close up of one of my favorite creations ever. 

A full tutorial for her can be found at the Globecraft and Piccolo blog today. 

Life is Beautiful.


Thursday, February 20, 2014

denim blues

It's new release week. And my-oh-my are the new items wonderful. Teresa here today with some great earrings that are just prefect to dress up my daily blue jean and t-shirt wardrobe. 


Lets get started.


From Globecraft and Piccolo you will need:
Vintage Corner Flourish Piccolo Set A157
Glasstique Gloss Finishing Glaze
- Embossing Adhesive
Deep Blue Sky Embossing Powder - this is a fine detail powder that can easily be used for stamped images.
French Loop Earrings 

You will also need
- assorted beads for the charm in the center
- jump rings
- 2 short pieces of fine silver chain
- assorted jewelry assembly tools
- heatgun


Now then let's get started.


I took two of the Flourish Piccolos and decided quickly that I did not want those extensions on them. These are laser cut from book board and are easily trimmed with scissors.  The top flourish has the extended parts and the bottom one has been trimmed.


After trimming the Flourishes, I embossed both sides of each with the Deep Blue Sky Powder. (every time I try a new powder it becomes my favorite)

I put three layers of powder on these.  The process of embossing takes just minutes,  so layering is easy to accomplish.


Just look at those gorgeous blue tones.


To strengthen and gloss up the finish, I cover the shapes with gloss Glastique Glaze. For the fine detail on these, I squeezed a bit of the Glastique onto a tiny paint brush and simply brushed it on.

Then I patiently waited for it to dry.


I gathered up my other bits while those were drying. You see two different charms there. I had a difficult time deciding which to use.


Just look at that blue.

After the shapes were dry, I added the chains to the tops of the curls with jump rings.

Added the charms (I finally decided the blue grey and silver looked best) and hooked through the earring loops.

Ready to wear.


The book board is light weight so these are VERY comfortable to wear. They can easily be customized for your wardrobe. Just pick your favorite color of the embossing powders.

There are some wonderful items in the NEW RELEASE section of the web site.

Have a beautiful day.

Thursday, February 06, 2014

heart of gold and pink and bronze

Well hello there ---- Happy Thursday all. 
Teresa here with a little bit of sweet love ornament just in time for Valentines' Day.

My taste runs a bit toward the more shabby toned colors so the ornament features some of that. 


So - let's go shopping.

Globecraft and Piccolo products used.
Embossing Powder Adhesive
- Assorted Embossing Powders
       - Cranberry Wine (on the Heart Piccolo)
       - Mardi Gras 
       - Victorian Bronze
       - Vintage Silver
       - Vintage Black (on the Key Piccolo)
Delicate Heart Earring Charms 
Cerchio Key Charm
Gloss Glastique

Extra goodies.
- three paper hearts (cut identically)
- fine gauge wire
- Assorted beads
- jump rings
- paper glue (I used a glue stick)
- a good glear gel glue.
- a heart stamp of your choice.


First - you can use the enamel adhesive  just like a stamp ink on your stamp.

Then stamp your paper hearts. I used assorted colors of the enamel powders.


On the heart above, I stamped the two Mardi Gras embossed hearts and heat set them. Then came back and stamped the Vintage Bronze heart and embossed it.

TIP ---- These are NOT fine detail powders.  There are assorted particle sizes in each jar. I poured out some of the powder on the hearts and dumped the excess off  for this part. That leaves mostly smaller bits on the paper to emboss.

Cover all three heart shapes as desired. Also notice that I have pre-scored a fold line down the center of the heart.


Now onto the Piccolos -

I covered both sides of the Delicate Heart Charm with the Cranberry Wine powder. Go ahead - click on that picture and just look at the sparkly bits in there.

After embossing the Heart,


I used the Gloss Glastique to protect and strengthen the shape. Cover one side and let it completely dry. then cover the other side as well.


Simply stunning. (I keep all the little punch out bits too. You will see that pretty heart shape from the center of this in a later project.)


Emboss the key charm with the vintage black powder and cover with the Glastique as well.

Now for assembly. Add a jump ring to the key. And tie on a very fine gauge wire.

Add beads to the wire.


Fold the three heart shapes in half and glue halves of one pair together. leave the other side unglued.

Add the third heart in the same way. But glue the two pieces together.

This will leave one flap open. Lay your beaded wire and key in that flap groove and glue with the gel glue. Then glue that flap closed. (let that dry)

Now add a few more beads and jump ring to the bottom of the heart charm. Tie off your wire to that jump ring.


Hang and enjoy. 

Now for the giveaway, each day this week we will chose one person from that day's comments to receive a $10 credit to the Globecraft Piccolo store.  Here are the rules:
  • Leave a comment on daily posts Sunday, February 2nd through Saturday, February 8th (comments here at MaggieGrace Creates do not count. You must go to the Globecraft Piccolo blog to comment. )
  • You must be a Follower of the Globecraft Piccolo blog
  • You must like us on Facebook (click on the Facebook tab at the top of the blog)
  • Only 1 comment per day per person
  • If you refer a friend and your name is mentioned in their comment, you will get a second entry to the drawing for that day
  • Winners will be chosen by Random.org and announced on Sunday February 9th
  • You can win on multiple days so be sure to visit each day
So to sum it up, we will be awarding 7 people who comment this week; Sunday, February 2nd through Saturday, February 8th a $10 store credit.  Good luck to you all.

Thursday, January 23, 2014

hearts on her tears ----

Good Morning  from the frosty southern US. Teresa here and I'm back with this week's fun creation. 


Being on the design team, I am challenged to see how far the materials can be pushed and I really wanted to see how the Embossing Powders reacted to being applied to smooth metal.

So lets look at some steps for this one.

Gather the supplies
- embossing adhesive
Mermaid Tears Embossing Powder
- gloss Glastique
- matte Glastique
fine applicator tip

other supplies
-bracelet blank
- I used heart punches from a favorite paper.
- tiny paint brush
- heat gun


See how smooth and shiny the blanks are.


We have all advised you not to Squeeze the adhesive because the applicator tip will come off -- well this time take it off. 


Dip a tiny paintbrush into the adhesive and paint inside the shapes (yes it does "gather up"). I found that I could manage about three hearts at a time. 


Roll the container of the Mermaid Tears Powder to mix the particles and sprinkle in the shape then heat.

TIP - do not shake any excess off for this project.


I'm sharing this because I do not want you to think this is a panic moment. You will have to repeat the application process. I actually had to do three layers of application.

Simply repaint the adhesive - add powder - and heat.


After three layers I had this lovely - The Mermaid Tears is a beautiful mix of tan, white, silver, and some ocean blue and green bits.


I then used the Matte Glastique as an adhesive to hold my heart paper bits.

Let this dry.

TIP - I keep my fine applicator tips   (yes I have plural) stored in water in the vials they were shipped in. This keeps them from clogging with dried enamels and glastique. I also keep a container of water close by to drop them in until I can clean them out. The enamels and Glastique are soap and water clean up until they are dry.


After the hearts were dry in place, I add a layer of the GLOSS Glastique to each shape. Then I covered the whole thing with a box lid to keep from marring the finish while it all dries.

I left this overnight and this morning I found........


Gorgeous - the Glastique brings out the various colors in the enamel finish.

And I am quite happy to report that, yes, the enamel adhesive and powder do adhere quite well to the smooth metal finish.


Please visit the archives for even more design inspirations and some really great tutorials. 

Life is beautiful.

Teresa (aka MaggieGraceCreates)

All images can be clicked to see the various bits of the embossing powder. Simply beautiful.


Thursday, January 16, 2014

starry starry night

Hello there again ---- It Teresa - and I'm back with a new item to talk about this week. 

It's a constellation pendant.


I read lots of blogs and decor reports and noticed a trend for constellation items --- these can be for your zodiac symbol if you like, but in my case I chose my constellation for sentimental reasons. The very first one I was able to identify (and still the easiest for me to spot) was Orion.

So let's gather our supplies
- a teardrop acrylic bezel
vintage black embossing powder
embossing powder adhesive 
glastique gloss glaze
fine applicator tip 
- pointed tweezers
- interchangeable bails 
- a silk necklace cord

you will also need a
- heatgun
- tiny flat back rhinestones
- a fine point permanent marker (I used a sharpie)

 There are a lot of pictures - but this is really easy to do.


I printed a picture of the constellation I wanted to use and then shrunk it to fit the bezel size on my copier.


Gathered my supplies. (I pulled out Matte Glastique first but ended up using the gloss)


The Acrylic Bezels come with this blue protective coating on each side that peels off before use. You can see through it. So I simply placed my bezel with the blue coating over my picture and marked the constellation points with the Sharpie. Then carefully peeled off both sides of the coating.  Keep this marked piece.


Pounce on the adhesive all over the front of the bezel and cover with the Vintage Black Embossing powder. The Vintage Black Powder is a gorgeous Black, Gold, and Silver mixture.

Things to remember here  ----- do NOT squeeze the adhesive bottle, a simple pouncing motion is perfect and ALWAYS roll the powder jar to mix the colors before you sprinkle your powder.


I used two coats of the powder and adhesive and learned that you can move the pattern around a bit with the air flow of the heat gun if you are going for a smooth finish like I was.

The longer you heat the powder the more smooth the finish is. A quick set leaves lots of texture. 

If you look closely at the picture above (the arrow), you will see two little place that the powder did not cover. Here's the fix.

I took a cotton swab and dabbed more adhesive in the thin area and than used my tweezers to pick up small amounts of the powder to fill just those areas.  (sorry - this picture is a little blown out, but I tried and tried to get a better exposure and being that close, it just didn;t happen) Reheat and ----


Here you have a really pretty representation of the night sky.  I did use my heat gun to "push" the powder around to get those two darker areas.


Take that marked piece of the protective coating and align it with the now covered bezel. (Be sure your orientation of the constellation is correct) Using something sharp (I used the point of the tweezers), press the star pattern into the enamel. The enamel is soft enough to take this pointed pressing and you will be able to feel/see the little indented areas for the next step.


Using the fine point applicator, dot the Glastique on those marked places and add your rhinestone "stars"

If you look closely (again see the arrow), you can spot the little indented places for the stars.

Let this dry -


After the stars dry, coat the entire front with more of the glastique. Let this dry completely.

Another tip ---- I have a cat who loves to help and can be a disaster for drying finishes. I grabbed a small clear bowl from the kitchen and cover my shape with that while it dries.


I added the pendant bail and a hung mine on a black silk necklace.

I love the Globecraft and Piccolo bails - they are interchangeable so you can switch your pendants as often as your mood changes.

I would love to see your versions of the Constellation pendant.

You can leave comments here or also on the Globecraft and Piccolo Facebook Page.

I'll see you next Thursday, but please visit everyday. There are lots of inspiring projects here.

Have a great day.

Life is Beautiful

Teresa (aka MaggieGraceCreates)