Friday, December 12, 2014

Oh Christmas Tree

Welcome to the SweetStamps.com Sweeties Holiday Blog Hop!!

With the Holidays right around the corner we thought it would be fun to share some lovely Holiday inspiration with you!

If you are arriving from Shelly's Place, welcome to MaggieGrace World.   If you haven't and would like to start at the beginning, please go back to the Sweet Stamps Blog. I promise there are lot's of great ideas and inspiration being shared. 

Be sure to leave comments along the way for your chance at winning!  We will randomly choose one winner from all the comments left!

********************************************************

I am all about easy and fun projects and this is no different than most of mine. 

Today I'm sharing a cute little Christmas Tree Ornament. (it will hang or stand)

I can see several of these across the Mantel in assorted sizes. 

The list of materials is at the bottom of the post. 


Make yourself a cone from green cardstock. I make my cones using a half circle and simply rolling into the cone shape and gluing in place. The tree part of this is about three inches tall and I cut a 5 inch circle in half to make it. 

While that is drying, Dig through your scraps (we all have those don't we) and pick several assorted green ones. (Or use strips of green papers).

Cut several of the Fancy Leaf shapes. These do not have to be complete cuts. Be sure and cut some from both directions by turning your paper over to the "wrong" side for some of the cuts. Trim just the leaves from the cuts and discard the flourishes. 

Flex the leaves a bit to give them dimension. 

Using Glastique as an adhesive, glue the leaves around the tree. Start at the bottom and let the first row hang off a bit below the edge. Move up the tree and overlap the leave all the way to the top. 
(I placed my cone over a styrofoam cone and pinned the leaves that wanted to slide off. using tiny pins and angling them under the next row area hides the holes very effectively.) 

Let this all dry over night.

Lightly mist the entire tree with spray adhesive and sprinkle with extra fine chocolate glitter.

The "star" at the top is a glitter paper cut using the Mini Flower Die. I cut it twice and used one openwork petal piece and the two solid backer bits. A tiny Pearl from the Brown Pearls kit accents the center with a bit of extra fine chocolate glitter. 

To stand this one, I glued two vintage spools together (you can buy reproductions at most any craft store) and set the tree over the stack. I glued the top one into the cone. 

See - very easy to make.

Make several and set up your own little forest of these. 

Don't forget to comment. Every comment gets added to the drawing for goodies. Also be sure to leave your email address in the comments (Blogger may or may not let me in on that information depending on your settings) 

Thanks for stopping by.

Seems I am ending this hop, I  sure hope you gathered some inspiration along the way. 

This link takes you back to the SweetStamps Blog


Check out all of Sweet Stamps "sweet" goodies here!
Happy Hopping, Happy Shopping
and...

HAPPY HOLIDAYS!


Monday, December 08, 2014

Christmas Spirit

There's a song in the air
There's a star in the sky

Forget all of the hustle and bustle of the season. All of my thoughts lean toward a grungy stable, with average appearing, unlikely people, and a tiny Baby. 

We have beautiful stained glass depictions of the story in our church and when I spotted the Stained Glass Nativity stamps, I knew I wanted to recreate the idea of those windows. 


I first made the mottled blue background paper using distress inks. I simply streaked a bit of the blue and a (now discontinued) whitewash color. Then dried that with a heat tool. I stamped my image with ink and embossed the image with Copper Kettle Embossing Enamel. 

Now for the fun part. I used NO Embossing adhesive and covered the entire image with Bahama Aqua Embossing Powder, then dumped that back in the jar. This leaves a wonderful shimmery patina on the blue background. Now carefully dab the Embossing Powder Adhesive all over the image (does not matter if you go over the lines), trying not to remove the shimmer. Cover with UltraThick Clear Embossing Powder. Take a toothpick and trace the Copper Embossed lines, removing a fair amount of the Clear Powder from the lines. Emboss again. This gives a texture very similar to stained glass. 

Fussy cut the "window" image and, using Super Sticky Tape, adhere it to the card base. 

Beautiful - Elegant - Understated - Christmas. 


Wednesday, December 03, 2014

The tale of a long awaited FINISH -----


Once upon a time - The Man's Mama Norvan (Grandmother) made things too. 
We have some of these pretties at our home. 
They bring very special memories to our heart and mind. 

Sadly, we lost her in 1995. 
That was a long, long time ago. 
We cleaned out her home.
Years of possessions. 
Some came to live at our home.
Some with the other children and grand-children.

I ended up with several things.
Including a Payday Candy Bar Box of stuff.
(don't judge - it was a project box and I had great intentions) 

Many years.
Many re-locations of that poor box.
I went searching in my archives and located a picture of it on the shelf in the studio.

See. 


Things are changing in my world. 
Life is Beautiful and I am staking claim to some of the serenity that comes from
cleaning - purging - finishing
(overcoming hoarding is a battle - but I will leave that for my other blog
and in the midst of the battle, I lay hands on a Payday Box.

I did not have to open it.

I knew.

But because you don't - here is a quick picture of the contents. 


POLYESTER FABRIC (hideous stuff really) 
Thread.
Some cut circles
Bits of Cotton
Needles
and a few finished yo-yo bits.

I have two of the creations made from this project box, so I knew what it was. 

I'm finishing things.
INTENTION - the word of the year.
And this was the perfect kind of project for clearing my mind of some things. 

Here's what I've accomplished.

I dumped it all out.
Sorted. 
Tossed. 
Traced one of the existing circles. 
Cut as many more as I could from the fabric in the box. 
Cut cotton balls into smaller bits.
(Gathered the remaining fabric bits in a baggie - told you - this is battle)


And made myself a plastic project box. 

Hours were spent alone.
Silent (or with music).
Thinking.
Praying.
Pondering.
Crying.
Healing.
Loving.
Moving forward. 

But also -
Threading her needle (with her thread)
The rhythm of hand stitching is meditative, relaxing.
Allowing room for mind wandering.


I made yo-yo after yo-yo
Hundreds of them.
Placing the finished one in a plastic bag.
Picking that bag up and smiling.


This little pile kept growing. 

My heart filling with memories of Mama Norvan

Wondering where each scrap came from?

How it came to be that she started making these?

Wondering how she decided which bits went together?

I was relaxed in this process.

Creating without pressure.
(you know putting a project on hold for -  say - 19 years takes a LOT of pressure off) 

And one night this week, I finished as many of these as I could make with the contents of the box.


and TA-DAH

Fun little scrap fabric wreath ornaments. 

I found my two and added them to the pile. (the far right one was made by her, as was the one between the two pink ones) 

Several of these have been spoken for.
All will most definitely stay in the family.

And - that is now one box that is no longer part of my HOARD. 
I also have plans for all those fabric bits in the plastic bag too. 
(overcoming hoarding is a battle - please do not judge) 

LIFE IS CRAZY BEAUTIFUL. 


Sunday, November 23, 2014

thanks


Have you seen the other beautiful cards this week. The challenge for the week was THANKS and I am Thankful to be on this team of creative ladies.

For my card I again went with simple. A soft blue blank card, layered with various green hills, I stamped it using the Earthy package of stamps and the Swirly Tree Stamp along with the Framed Sentiments set,  using the larger of the two trees. I varied the stamping colors on my tree and the Sentiment.

These would be a great gift set - or even a good place marker at the seasonal gatherings.

Have a fantastic week.


Teresa 


Sunday, November 16, 2014

share a little love


Hello there. Teresa from MaggieGraceCreates here, bringing up the end of a week of the Lovely Layers challenge. 

It has suddenly turned cold in the southern USA, but until this weekend it has been a beautiful fall. This is my favorite time of the year and my card drew inspiration from the lovely fall color. 


I used the Fancy Leaf Sweetcuts Die and cut several assorted fall color pieces. To my card base I added a favorite piece of embossed paper slightly offset from the center of the card. Along the edge of the embossed paper, I started with my Leaves and simply adhered them in place with a tiny bit of Glastique just below the leaf area, leaving the leaves loose. I cut some of these in reverse so that my leaves twisted and turned both directions. After these dried, I bent and curled the layers of leaves and added a tiny little textured yarn bow.


I also used the Mossy Glen and Real Rust embossing powders to randomly layer and cover the Love Word Accent from Globecraft and Piccolo. Again I used the Glastique to adhere this to the card.


Here is a side angle shot showing how the leaves are dimensional from the card front.


Thursday, November 13, 2014

Nesting in the fall

First of all you need to take off and go see the ABSOLUTELY STUNNING NESTS made by Miss Vicki Boster. I have one of hers and it is beautiful. I was inspired by those and decided to try to make my own version of the nests. 

Mine turned out totally different. 
I am pleased with this, but hers are still the absolute best. 


An assortment of yarns in fall colors - my favorite yarns. I gather small skeins from all over the place. Each road trip finds me looking for a yarn shop where I may buy enough for a project or just one special skein for a memory. 


My stash of ribbon - lace - buttons - and beads------ well it is wide and deep as well. 

This gave me a chance to use some very favorite things. 

Crochet a base - add loads of yarn, ribbon, lace, other bits. 

It pulls you right on into that "head space" where this bit makes this bit sing and shout. 

So much fun.


You can't tell in the photos, but this thing is a large sized nest. 

Like serving platter sized. 

Those long long tassels of yarn give it a beautiful drape.

Lots of color and texture too. 


Strings of beads and silk leaves accent the edge. 

A place for my feathered friend to perch.


I took him out into the leaves for these pictures. 

Perched him in the Ginko Tree. 
(at the local bank) 
(I know people look at me so strangely. Crazy lady standing on a box taking a picture of a pile of yarn in a tree) 

Yes friends

Today that crazy lady was me. 


I am so very happy with this - and there will be more. 

And the even greater part

All of this was already in my stash.


Have a wonderful day. 

Sunday, November 09, 2014

Many thanks

Good Morning. I'm Teresa and I am new here. I am bringing you a fall colored Thanksgiving Card. 


I used several thin strips of assorted paper scraps for the background of the card. I glued them down onto a plain copy paper backing and then trimmed to fit my blank card base. Then using the Winter Village Scene Die I cut a circle from a lighter card stock (I kept the winter scene for a later time). Aligning the "frame" where I wanted it to go, I embossed an almost sheer layer of Mermaid Tears enamel to soften the background for the metallic copper leaves. The leaves are two cuts using the Fancy Leaf Die that I layered and then trimmed the "extra" from. I stamped and embossed the sentiment. The final detail was the addition of eyelets and some textured yarn. tie on a button. Now this one is ready to leave as a tiny token by everyone'e Thanksgiving plate.

Have a wonderful remainder of the weekend.

TERESA


Thursday, November 06, 2014

OVER HERE ---

I am over here today.

A more personal blog post about the hoarding  keeping of stuff for sentimental reasons.

Follow on over if you like.

Have a beautiful day.

Thursday, October 30, 2014

thank you - a new venture begins

This is my last post as a Design Team member for Globecraft and Piccolo. It has been a wonderful experience to work with these products and all the creative people around this product. This however, is not a sad farewell, as I have been asked to join the other designers on the SweetStamps Design Team. SweetStamps is the sister company of GlobeCraft and Piccolo so you will still be seeing lots of these products.

For my farewell design, I have made a cute little note holder. Again a very easy project.


I used the following SweetStamps and Globecraft & Piccolo Products

Large Stemmed Rose Accent 
Ruby Red Slippers Embossing Powder
Mossy Glen Embossing Powder
Enamel Powder Adhesive
- Framed Fancy Words Clear Stamps
Micro White Embossing Powder 

Miscellaneous items
- spool
- hairclip (bobby pin)
- Glue (ultimate glue is great)
- chalkboard paint (black acrylic will work just as well)

Paint the spool with the black paint. Set aside to dry.

Emboss both sides of the Rose Shape using the Ruby Red Slippers for the flower head and the Mossy Glen for the leaves and stems.

Stamp the word "thanks" onto the spool and them emboss with the MicroWhite Powder. I left a bit of the loose powder on mine to imitate the chalkboard - just the effect I was after.

Glue the clip to the back of the Rose (I slipped a small piece of plastic into the clip to prevent gluing it closed.)

Glue the rose into the spool.

Leave a loved one a note saying thank you .


There are so many available shapes on the G&P site, you can customize these for any occasion. They would also be beautiful place card holders as well.

Thank you again for visiting me here. Please follow me on over to the SweetStamps blog. Those designers are amazing as well.

Life is Beautiful -- Teresa

Wednesday, October 22, 2014

happy birthday card


Good Morning Everyone- turns out that October is full of Birthdays in my family. So I sat down and made a pile of simple cards.

These are quite simple and easy ----

I had these blank cards (by the Paper Studio) - So I used these and added simple embellishments.

I used the following GlobeCraft and Piccolo products.
Glastique (as the adhesive)
Embossing Powder Adhesive
- Gilded Rose Gold Embossing Powder 
ATC sized Frame from a Piccolo Set - (several sets have the frame, I simply bag all of these together as I punch out my shapes)

From SweetStamps I used
Birthday Elegant Stamp
- Rustic Ink From the Earth Ink Spots Kit
- legless brads from the Chocolate and Marshmallow set 

- ombre toned embroidery floss

Easy. Quick. Beautiful.

Emboss the corners of the frame with the Gilded Rose Gold. Adhere floss to the back side of the frame and tightly and smoothly wrap the frame with the floss. (a dot of glastique is all you need to hold the floss in place. Glue frame to card to accent the area you like. Stamp with a sentiment. I added the Candi Legless Brads to further accent the corner.

Have a wonderful weekend.

Thursday, October 16, 2014

it's a Luke Bryan song inspired box.

We all have things we want to keep. Especially memory things. This is a Memory Box. Ready for beach photos, maybe a ticket to the pavilion amusement park, even a few seashells. Every time I heard this song, I knew I wanted to use the imagery from it for a project. 


It started with a kraft paper recipe box. And this wonderful soft toned "beach- washed" wood scrapbook paper. 

To that I added the following items

From GlobeCraft and Piccolo 
- 3d Enamel Gel 
        Honey Mustard 
        Orange
        Coral Pearl  
        Satin Honeydew
- Embossing Enamel Powders
        Micro Gold 
        Cranberry Wine
        Mermaid Tears
        Temple Stone
        Starry Sky
        Mossy Glen
        Platinum
Piccolos
        Vintage Cross Accent
        At the Beach Accents


From SweetStamps
        Java Sparkle EP
        Desert Sparkle EP
        Super Sticky Tape
        Brown Pearls

I used the Sticky Tape to adhere the paper to the box. 

The orange and green flower is glued to the top only and does not interfere with opening and closing the box at all. 

I trimmed down the "sand" below the palm trees. 

This was a really fun little memory box to complete. 


The Mossy Glen is PERFECT for those palm tree fronds. I used a tiny paintbrush and the Embossing adhesive to use the different powders in these detailed accents. 

Please. If you create a project "inspired by a song" leave me a comment so I can go take a look. 

Have a wonderful Thursday --- Teresa 

Wednesday, October 15, 2014

from the stash .......

Look over here to see how I am trying (I repeat - trying) to make peace with what I have versus what I use. 

I am selling - discarding - donating - using
or trying to anyways.

 I just finished a baby blanket for a friend.
I have yarn left from that project that I intended to simply make another baby blanket. 

But then this happened. 


years ago I remember my Mama making a rectangular granny afghan. She worked on it at the campground over that summer.
It must have been the 70's because it was avocado green, and gold and brown. 
I have NO IDEA where said afghan is now. 
But I have repeatedly asked for the pattern and she had been unable to find it. 
(Here is where I insert - hoarding tendencies go way deep in my life - her stash is really wide and deep as well.)

Several weekends ago she gave me some vintage craft books and on of those books contained THE RECTANGLE GRANNY AFGHAN pattern. (I know I could have searched for it, but I really wanted this to come from her) 

Well over ______ ago (time frame left blank to protect the hoarder), I bought these mill end packages of fairly heavy yarn. White with tones of sage green. They were ON SALE at JoAnn's and I couldn't resist. I bought three bags. Got home that day and added them to the pile stash. The big bag has been sitting there since.  (Oh please please tell me I am not the only one who has been guilty of this)

Last night before bed - I simply made up my mind to clean off the top of the stack this bag was on - I gathered that yarn and that pattern and I started a RECTANGLE GRANNY BLANKET. It actually felt good to start using that yarn and the table looks so much better not all piled helter skelterish.

I honestly believe that I could craft for a year with out a purchase of materials. 

As a matter of fact - approaching the end of the year of INTENTION - I think my word for next year may just have a way to encourage being a good steward of the things I have already bought. 

Let's just see how this works. 

Much love - many prayers


Thursday, October 09, 2014

after......

The storm had finally passed. She cautiously walked through the devastation. Looking. Searching. Picking up a small piece here. Another over there. They would celebrate the clearing. They would celebrate the surviving. A masked ball. A way of celebrating all while hiding the fear that the storms may soon come again..............

It's halloween time and when I found the plain white hard plastic masks, I knew a story would be unfolding while I made this. 

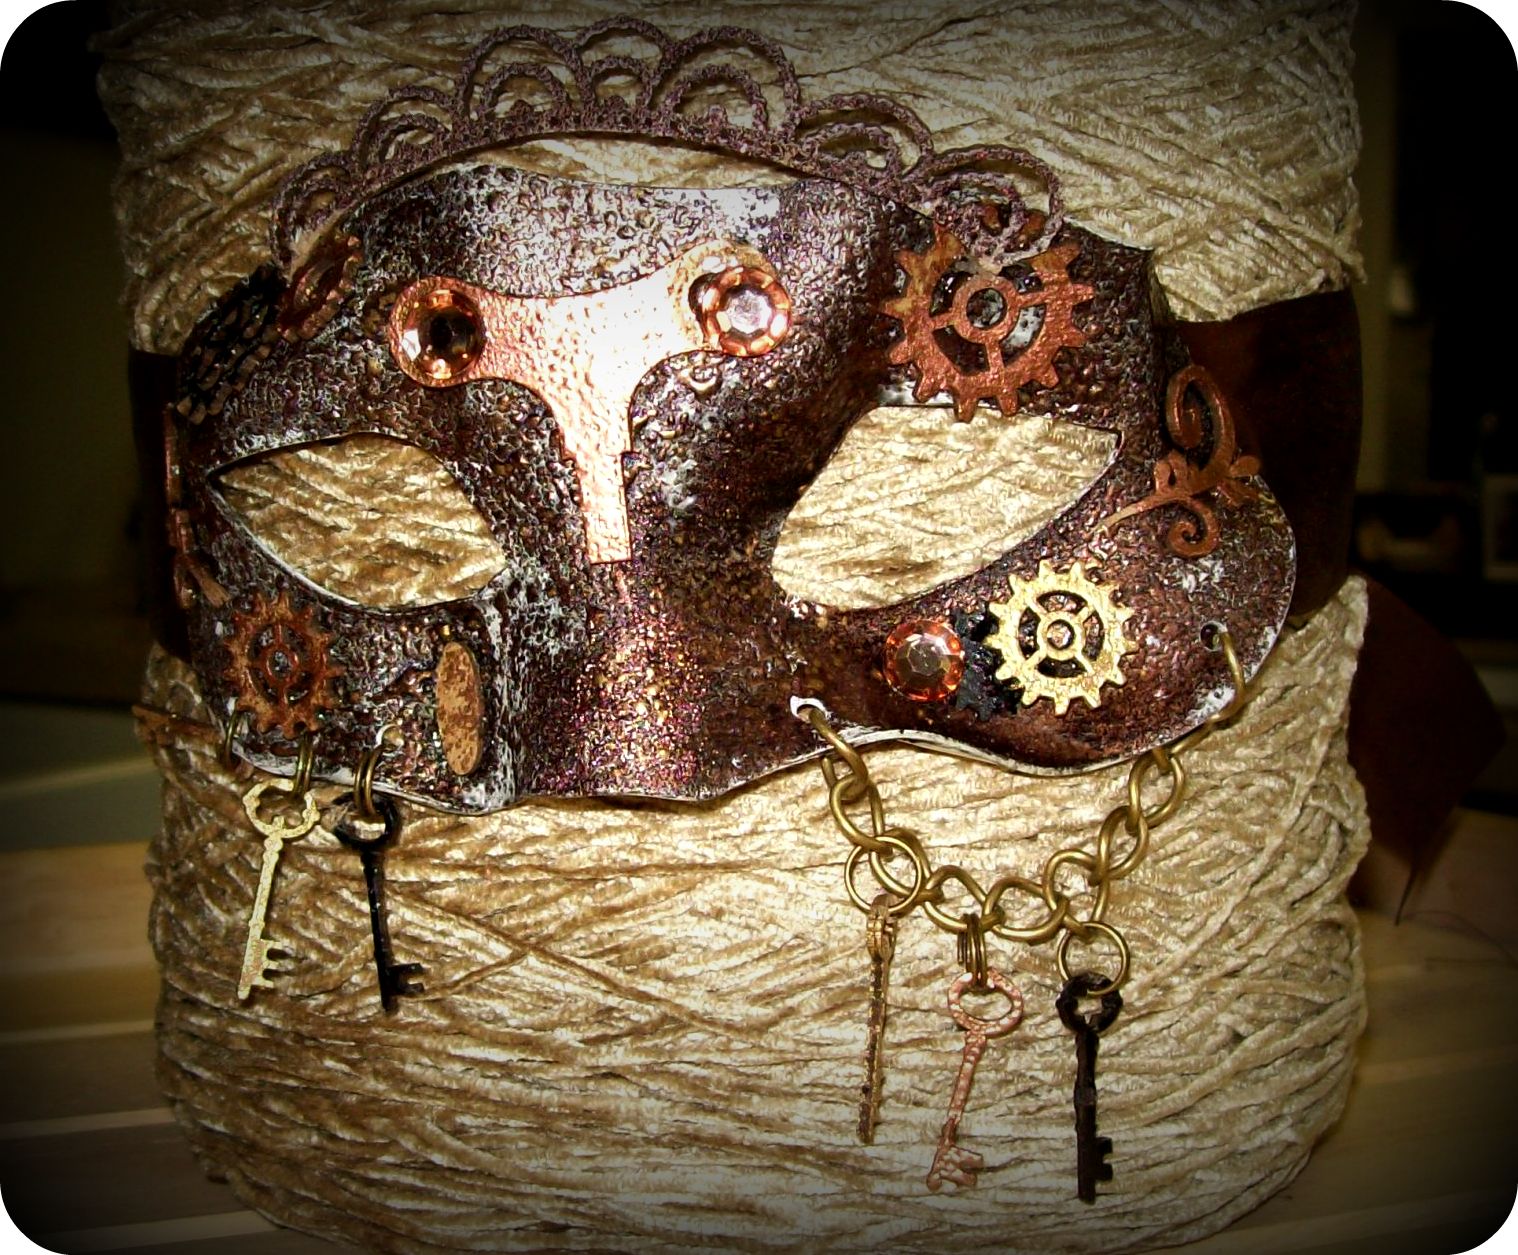
A STEAMPUNK STYLE MASK. 

First I took my heat gun to the plastic of the mask to see if I could control the warping and shrinking of the plastic. I found that if I was very careful, I could. Yes, this would work. 


Globecraft and Piccolo Products

- Enamel Powders (linking to the main section)
     I used the following --- Copper Kettle, Gilded Rose Gold, MicroCopper, MicroGold, Starry Sky,
    Victorian Bronze, Vintage Black, Vintage Copper, Micro Black.
Enamel Powder Adhesive 
Antique Brass Cable Chain Necklace
- Flower Flourishes (at the tie locations)
- 1-2-3 key accents (i used 6 of the smallest ones)
Steampunk Windup Keys 
Steampunk Mini Gear Accents 
Vintage Gears Accents
- french oval frame accent
Glastique (used as an adhesive)

Sweet Stamps Products
Java Sparkle EP powder
- Br Pearl and Rhinestone accents


Emboss the mask with assorted Embossing Enamels. Work patiently and carefully, allowing the mask to contort as you work. Layer the powders, Overlap as well. Wearing a silicone glove (available in the kitchen section of any department store) will allow you to gently shape the mask while it is hot.  I continually held this to my face to check that it remained comfortable against my face.

Once the mask is covered as you like it, Punch two holes for the chain and three holes under the "eye" on the opposite side.

Glue your ties to the back of the mask with a heavy bodied glue.


Now emboss your elements (I snipped a piece of the French Oval Frame for the "crown") 

I had a great time with all the different powders. 

Now add these to the mask using Glastique. (here is another trick - nothing sticks to the silicone "hot pad" - I cut one of those into small pieces and use that to clip things into place while they dry. This keeps the clips from sticking to any excess glue that may seep around an embellishment.)


Using Jump rings add three of your keys directly to the mask on one side and then the chain holding three more to the other.


Have a wonderful Thursday - Teresa

Wednesday, October 01, 2014

Gift Idea .....


Happy Thursday. Teresa here with a great gift idea. Mine is Christmas themed, but with the assortment of Piccolos available from Globecraft and Piccolo, you can customize this for anyone.

This began as a tall prayer candle in a glass from the Dollar Tree.

I used the following items from Globecraft and  Piccolo

The Christmas Story Piccolo Accent 
- Embossing Enamel Adhesive
- Starry Sky Embossing Powder
- Gilded Rose Gold Embossing Powder

I pulled lace, a button, and a copy of vintage sheet music from my stash.

Easy to do. Emboss the Piccolo with you chosen powders. I used the Starry Sky on everything except the star and the was done with the Gilded Rose Gold.

Adhere the sheet music to the glass using spray adhesive.

Attach the shapes to the music using a heavy bodied glue . (I use elastic ponytail holders to hold the shapes in place against the curve of the glass until it dries completely)

Tie on a fluffy lace bow. Add a button accent.

Ready to gift.

Have a wonderful day.

Thursday, September 25, 2014

Reminders


Good morning all. Teresa here again with some quick and cute note pins for the fridge.

I have a big group of kids in my life (not all my direct relatives) and I support them in as many events as I can. Keeping it all straight can be a bit of a challenge. I was making these little clips for an event and thought why not personalize some for each of those kids - then I will have a clear visual reminder. The many shapes offered in the Piccolos and the colors of the Embossing Powders made this a fun and simple project.

Let's Shop - ( I am linking to the specific items from the photo, however the two links above go to the main sections of the site.)

- Glastique 
- Bahama Aqua Embossing Enamel
Poodle Skirt Embossing Enamel
- Enamel Powder Adhesive
Key Accents Piccolo Set 
Flower Flourishes Piccolo Set

Misc items
- wooden clothespins
- decorative paper
- round strong magnets
Ultimate glue 


Adhere a sliver of the decorative paper to the clothespin using the Glastique. (This is a wonderful paper adhesive. Available in a Matte or Gloss finish. I love using this)

Emboss one of the larger Key Accents with the Enamel Powder Adhesive and Bahama Aqua Powder. (I like how this pulled the blue tones in the paper pattern) Also emboss one of the Flourishes with the Poodle Skirt Powder.

Adhere the Accents to the clips using the Glastique.

After this dries - add your magnet to the back of the pin.

The look fun and pretty lined up across my Refrigerator.

Try these combos.
  picnic check paper with the BBQ Accents
  gothic paper with a Vintage Black Top Hat from the Gentlemen Accents 
  bright yellow paper with the palm tree from the Beach Accents
  camo paper with a deer from the On The Hunt set

Another option would be one for each day of the week.........

Each of the kids knows which one is theirs on the fridge and they add the notes to their clip. So much fun.

Quick and easy ---