It has rained in northeast Georgia for weeks now. Leaving us trapped inside A LOT. Fortunately, Iv'e been quite busy playing in MaggieGrace World.
There has been play with glitter and glue.
Some serious paper and string play too.
A little bit of fabric and handwork fun.
Then there was one full day of pretty weather.
The table below was the bridal party table at my daughters wedding in December. I have all this stuff still around the house. See that pretty "tin" piece under the lamps. Yes I even kept those. They were created from anaglypta wallpaper. I painted them with various spray paints to look like tin ceilings.
And my booth at Junk in the Trunk is in need of a new display.
I am also very determined to lose some "stash weight"
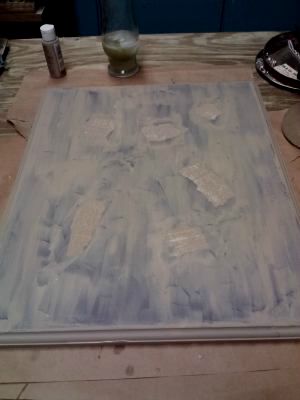
So I scrounged around and found a cutout from an oval whirlpool deck. I was going to paint it, but then I remembered that I had those wallpaper "tin" squares. And since my artistic focus is RECYCLED AND REPURPOSED, I decided to try and use those pieces.
I chopped of the bottom of the cutout.
I lay the "tin" squares out on it. (Making sure I had enough - let's just say I've been guilty of not doing this little step in the past)
Dappled sunlight on the front porch - scissors - spray adhesive - brayer --a couple of hours in the muggy nasty heat and I had this. (to quote a comment from my facebook - a big knight's shield).
I stood back - and decided quickly that using those squares was genius.
Shelves for books were required and, at my grown up girl job, we get pipe with these hardwood bands securing the shipments. So I snagged the chop saw and cut a few bands to length. A sample paint pot of a color called TWINE and painted the shelves.
I really wanted to mount them with L-brackets --- and again went to the wedding decor items. I took apart the barrel of bamboo that was outside the venue and reused the brackets and screws from that project.
Here is the resulting display.
Those huge shelves are on my porch ---- waiting for their move into my living room and dining room. One set is 7 feet tall by 11' long and the other is shorter but the same height.
They came from an old store building. See that story here.
I'm hoping this post finds you having a beautiful life.
Showing posts with label recycled. Show all posts
Friday, July 26, 2013
Thursday, July 18, 2013
I still do make things and notes on stash busting....
We are getting nine beautiful new blessings in our life this year. That means 9 baby gifts for Miss Teresa to make. I'm well into it and have posted a few of them already. This is also a challenge in that I want to finish ALL of these from my stash. So far - so good.
This one is the latest finish. Honestly - I had no idea if I would even like this one. I so rarely work in any kind of bright colors. The purple lustersheen yarn was in some that I was given a long time ago. The white was from an afghan that my mom started and didn't finish. While I had the pattern and the same size hook, I was not able to get the stitch size right. So I "frogged" it and kept the yarn. Plain granny square pattern, a fairly quick finish. The center is a strand of white and purple, the white band is two strands of the white, and the purple is two strands bright, all held together for the duration. (Is there some magic trick to doing that easily? My yarn kept tangling on itself.)
When I finished it, I do like it. Its for the next girl.
I had quite a bit of yarn left from the "green" blanket. (yes, I know its not green - but there is green in there and that's what we wound up calling it.)
The next baby on the list is a boy. So I wrangled with myself and decided to go with the idea that these could be "boy colors" and maybe be used for longer than just the "baby" years. I love the basketweave pattern on the blanket above so I am using that same pattern and yarns on the smaller blanket. That's the travel project right now.
The pattern is basic double crochet in a variation. The blanket above was done in a 4 stitch block. Here is a link to a tutorial on the stitch.
There has also been a bit of studio work. A friend of mine wanted a spoon pendant with her husband and children represented. Here is that fun piece. --- a topaz, garnet, and turquoise drop (birthstones) completed the assemblage.
Then on a jaunt thru the foothills of the North Georgia mountains, I found these keys, The graphics on them were so pretty to me. Aged just right too. I haven't had much studio time, but I did sit down and pull some blingy stuff out and make two necklaces.
This one is a mix of a key and an earring single that I just couldn't toss. I mounted the bling on the less decorative side and left those gorgeous graphics uncovered, so this one can be worn either way.
I also look for butterflies everywhere I go and find them often. This necklace is a mix of a butterfly and a skeleton key. Loving this one too.
Both necklaces will be in my booth at Junk In The Trunk in Athens, GA .
And last, just because he's cute and lovable, here is my sweet helper after a really long day of babysitting the cat. Isn't he sweet. Have to say, he's a great dog, but that tail is NOT coffee table friendly.
I hope you guys are well --
My life is beautiful ---- have a wonderful day.
about the stash busting --- What is it about creative "stuff"? I keep bringing it in and I can see all the incredible things to be made, but then I have a hard time using it. This is an issue I continue to work on. I turned 48 on Sunday. At a friend's suggestion, I am going to try and make 48 projects before my next birthday using nothing but stuff I already have. Goes along with HAPPY DO YEAR quite well, don't you think?
Teresa
Wednesday, March 20, 2013
a new display
People think I am nuts sometimes.
I literally squealed with glee when I spotted this piece of stunning artwork at the thrift store.
Drool ---- gasp ---- HAD TO HAVE IT.
You all know the reaction when you find it ----- it being THE PERFECT THING for that spot.
Giddy with excitement - I took my discovery to the front and for the way too high price of $1.50 I now own this lovely.
A prime example of HOTEL/MOTEL art.
Yes - you can laugh - I did.
Actually I bought it because it is screened on a nice piece of ogee edged MDF.
It lived tucked in beside the refrigerator for quite some time. Until Friday night. Then I took off to the studio with this and an idea for the transformation.
I painted it dark brown, then this color named Country Tan was messily brushed on. Add torn pages from a dictionary too.
And at this point - I got sidetracked playing with my stuff. This almost became an artwork . Notice the adult beverage in the top of this picture. (Needless to say --- I was enjoying playing with fabric and lace and trims. And my art piece was "brilliant")
I took pictures. I loved what I was doing. It was going to be gorgeous.I was relaxed. I was happily playing with fabric and lace and pictures and ebellishments. Again I call attention to the adult beverage.
It got late and I decided rather than to proceed, I would rest and attack on Saturday Morning ------- I just knew I would have a beautiful art piece that I would claim and hang in my house by Saturday evening. Smug and very happy, I went to bed.
THIS WAS A VERY SMART IDEA.
I got up early and traipsed off to MaggieGraceWorld. Opened the door and gasped. I'm thinking someone screwed with my stuff during the night. Maybe Mr. Black Snake was there.
The beauty from the night before was not nearly as brilliant as I thought. As a matter of fact - it was what some folks would call a "HOT MESS". It would cause Sweet Southern Women to shake their heads and say "bless her heart" or "must have been a gift or she would never hang that on the wall" . Or even ---- "wow, I would put that in a room nobody else sees."
Yes it really was that bad.
Anyway --- it being Saturday MORNING, I was unaffected by that glass of green liquid.
So I took it all apart and proceeded with the original plan.
Quilted muslin stapled to the MDF.
Add vintage Rickrack and buttons.
A row of brass hooks.
And voila........
A wonderful new display for my booth at Junk in the Trunk. Yup - I like it. And it was (is) perfect for the space.
I have had the necklaces displayed on individual cards for a while. This changes the look and it's easier to check the chain length and such. It was a great decision to take this approach.
I hope you have a wonderful day ----
Teresa
Labels:
bits and bobs,
Junk in the Trunk,
recycled,
repurposed,
things for sale
Friday, March 15, 2013
keys to the treasure
The process of reclaiming the studio is so close to being completed.
As I finish a cleaning / organizing an area or a box or as I bring another box out of the house and put it away, I reward myself with some "MAKE" time.
So I'm DOing and I'm using.
Plus -- I got stuff to sell.
I finished the Lace organizing project yesterday. Then I gathered a few things.
Like those old keys above.
I took my dremel tool (it is one of my favorite purchases ever) with a metal brush attachment and cleaned these up.
Not too clean -- I am pretty fond of that vintage patina.
Above you can see the "after" --- the one at the bottom really is nice.
I also gathered some bits and bobs and some Amazing Goop adhesive.
I made these.
oops.
Actually I made 5 --- Missed one in the first picture.
Here are the details
#1 --- Tiny key with a rhinestone button. This is a little over an inch long
#2 --- Antique silver butterfly charm.
#3 --- A personal favorite a tiny Mother of Pearl Button.
#4 --- Words of advice. The square piece is part of an earring. I used ModPodge Dimensional Magic to adhere the words.
I am actually wearing the Words of Advice one right now.
#5 --- Octagonal Bling. Also part of an earring.
A better view of the Aurora Borealis beads on this one.
Each will be hung on a 20" silvertone ball chain. (Yes I will sell the one I have on.)
They will sell for $15.00 - $20.00.
I hope people like them as much as I do.
But the most important part of this post ---- I am making things in my studio again. It feels so good to be awakening my creative self again.
Have a great weekend
Labels:
creations,
Junk in the Trunk,
recycled,
studio,
use what I have
Tuesday, October 30, 2012
more accomplished
I took last Friday off to play with the Bride-to-Be. Let me just tell you out playtime was really really just hard work.
Then, I scrubbed up the parts and outside we went to the "spray booth" (lest you think I am that well set up at my house, the spray booth in this case was an outdoor bench and a drop cloth). I used one of my favorites -- spray paint and coated them. I went back and forth doing other things while adding additional coats.
I cleaned the beveled glass panes.
Dug in the lace stash and found some I adore.
Then sprayed that lace with spray adhesive.
After giving that a few minutes to "set", I trimmed them at the edges. USE A NEW SHARP XACTO BLADE -just saying.
Aren't they pretty.
Then .....I reassembled all the parts.
And look ...... a table lantern.
Honestly, this turned out even better than I imagined it would
Just for smiles, I added a candle on Saturday night.
ANOTHER NOTE, FOR SAFETY REASONS (THIS GETS HOT IF THE CANDLE IS TOO BIG) USE ONLY A LITTLE TEALIGHT IN THESE. OR A LITTLE LED CANDLE IF IT WILL BE UNATTENDED.
I'm loving this one too.
This was not inspired by a pin, but I hope it inspires someone.
I shared the CAKE TABLE yesterday. That was finished on Friday. Then there was this also on Friday night.
Molly ran a copy of a graphic she found online ---
Grabbed a sheet of transparency paper and my overhead projector and a black canvas I had painted.
Since so many of my surfaces are being used for various stages of projects for the wedding, she actually grabbed the dog's pillow and headed to the floor by the dining room island.
Using white paint and tiny brushes she lettered and lettered.
Not sure why, but the bandanna is required attire for her painting uniform.
Here is her result from three hours of being in the floor.
Props will be staged for our guests to use and a digital camera on a tripod. Knowing some of these guests, this should be fun.
A budget decision was to now rent chair covers along with the table linens. But she wants a pretty detail on the chairs, We got lots of paper (mama has a paper fetish) and using the same die set I punched 250 large hearts in solids and then 250 smaller ones in patterned papers.
Each of these will be punched in the center and added to the backs of the chairs with a tulle and ribbon bow.
Then there were some of these that I bought at the habitat thrift store ----
The ones I bought looked a lot like this .... corroded. Nasty. Rusted in spots.
I bought two with an idea to try --- (they were so bad, I only paid a dollar each)
The Man at My Address -- Father of the Bride took them apart and ripped out the electrical.
The only issue was that the backer mounting plate was riveted on and the rivets had to be drilled out to get those off.
Then, I scrubbed up the parts and outside we went to the "spray booth" (lest you think I am that well set up at my house, the spray booth in this case was an outdoor bench and a drop cloth). I used one of my favorites -- spray paint and coated them. I went back and forth doing other things while adding additional coats.
I cleaned the beveled glass panes.
Dug in the lace stash and found some I adore.
Then sprayed that lace with spray adhesive.
After giving that a few minutes to "set", I trimmed them at the edges. USE A NEW SHARP XACTO BLADE -just saying.
Aren't they pretty.
Then .....I reassembled all the parts.
And look ...... a table lantern.
Honestly, this turned out even better than I imagined it would
Just for smiles, I added a candle on Saturday night.
ANOTHER NOTE, FOR SAFETY REASONS (THIS GETS HOT IF THE CANDLE IS TOO BIG) USE ONLY A LITTLE TEALIGHT IN THESE. OR A LITTLE LED CANDLE IF IT WILL BE UNATTENDED.
I'm loving this one too.
This was not inspired by a pin, but I hope it inspires someone.
Monday, September 10, 2012
more fun stuff
At the Dacusville Farm Days Festival there were flea market goodies - and there were farm equipment vendors. But there were also craft booths.
It is rare to see something new and totally different in the crafting world but I spotted these.
Tuesday, September 04, 2012
THE FIRST "BIG" THING
Way back here, I posted the start of the first really decorative element for this wedding. I have posted details of the project all along since then.
Well that danged light is now finished. I put the final touches on it this long weekend.
Above is where we started --- sorry, I was really bad blogger and that was the only before picture I could come up with.
Hope you want to take a look at the final touches.
Above is the very basic area that was just way to "flat" looking for me.
I thought and thought about adding pearls or rhinestones to this but then I happened on some magnificent pearlized paper.
So welcome Modpodge. I love it. Subtle from a distance and it simply adds to the overall wedding look of the fixture.
The next thing that bothered me was that all the cups were plain -- remember I removed the electrical from this fixture so it will be all candles.
Again I dug through the stash. I thought about lace - then ribbon with dangly stuff. Then I found another stunning paper - a creamy iridescent paper. And I punched enough scallops to cover all the cup edges.
They needed just a bit of extra - and I had ordered these tiny rhinestones. That is sitting on my pinky fingernail for size purposes. I glued and glued - picking them up with a tiny little microbrush using the lick and stick method (the same kind of method my Nanny used on her hanky to wipe a spot off my face) . Lee Valley Hardware rocks.
This is a close up of that detail work.
There were lots of them. It took hours to glue all those tiny sparkles.
Then I glued them around the cups. It dressed the candolier just the final amount of perfect.
One more little detail - a removable one, because the fixture comes apart to be moved.
I added some vintage embroidered trim to the top. It attaches with velcro to the top cup of the fixture. It fills in the open space at the top nicely.
It is now hanging in the bedroom and simply waiting for the next part of the project --- the arbor to hang it from
Here is a picture of the finished fixture -
What cha think folks????
Labels:
creations,
pinterest inspired,
recycled,
that wedding
Subscribe to:
Posts (Atom)