Showing posts with label pinterest inspired. Show all posts

Tuesday, September 24, 2013

Gifts from the stash.

I've been steady working in the studio. 
Crocheting and working on all kinds of things. 
Some just could not be shared yet. 
(Trying not to spoil the surprises.)

This was one of them. 
Plus posting everyday for Simply Simple September has been easy and fun. 
And has allowed me to take a bit of a break on working up posts.

Way back here I talked about the babies joining our life. 

I also mentioned nothing would have to be purchased. 

Well - so far so good on that. 

I am one blanket behind. Little Eloise Ruth's blanket is NOT finished and she is here. But it is still warm weather, so I'm not panicked. 

I decided to do some words art for a few of our little ones. 
(the decision was made after "stalking" mommies to be pin boards) 

I have 100's of word art images pinned as well. 

And - I happen to have all the stuff to make these
IMAGINE THAT

So for Miss Kris' next new grand baby. 

I grabbed square canvas and painted it pale blue. 

Then cut my letters for an easily recognizable children's prayer


And because this is me - I used my CRICUT and the basic cartridge to cut these - I trimmed the "tails" off some of the letters. 

Mod Podge it all on the canvas and look at it and decide it needs "SOMETHING"


Go dig in the stash
(yes it is a seriously deep stash) 
And find a star shaped ornament.

Add lots of extra fine glitter to the star.

I also added a layer of metallic ModPodge in silver to the canvas. 
Because I like texture and depth. 


Here it is all glued. 

At this point I let it dry
Then Spray it with clear sealer.
An important part of the process in the humid south. 
The ModPodge can get tacky (sticky) in the heat and humidity and the sealer stops that. 
I just use a clear spray paint  top coat for the sealer.

Then pondered how to attach the star. 

A hole drilled in the edge of the canvas with a skewer glued in turned out to work best.
Then I glued the star to the skewer. 

Voila


Cute little boy artwork. 

(I'm kinda fond of texture of my studio siding too)


I also agreed to swap an ATC with Kim over at ArtJoyStuff.
I have not done one of these swaps in ages. 


I dug into a deck of vintage playing cards
and put this little art together. 

Go here to see what I got in return.

Totally different styles. But I think that is what the swapping of art is all about. 

I hope this finds you enjoying a beautiful life. 


Tuesday, March 05, 2013

as for me and my house......


This sweet young couple is getting hitched. I've known Luke since he was a toddler. Chazlyn is just so sweet and they are adorable together.

Our church is giving them a bridal shower on Sunday and I am in charge of the decor (imagine that).

Well I saw this image pinned to her Pinterest.


And that set me on the direction for the decorations.

These are the preliminary ideas and were made on my work table (thank you Crusty Old Guy for adapting that table for my sudio IT IS PERFECT)


Each round table will have white cloths and a kraft paper runner. Then these centerpiece toppers. The rustic crosses are short pieces of grapevine, wired together. and topped with a heart at the intersection. I really like these crosses.

I made several and will most likely make a few more.


Those pretty individual hydrangea blooms are silk and I have stamped them. Each has three and are stamped  - FAITH - HOPE - LOVE.


I've already posted the birdhouse (it will go home with the lovely bride) I will be displaying it elevated on a wooden box and there will be a tiny bit more detail added to the display. This will be on the main food table.

I'll post final pictures next week. But right now I think I am on the way to capturing the "feel" of that pin.

Did I mention that I really like these wooden crosses???

Have a blessed, full of joy, full of thanksgivings kind of day.


Wednesday, February 13, 2013

all about love. A PINSPIRED PROJECT

Following Miss Molly's wedding, I suddenly found myself talking to other people about the DIY parts of the wedding quite often. I have not found myself in a quite unplanned wedding support role for others.

 A customer in my Grown up Girl job has asked for a few crafted items for his daughter's wedding.

I agreed to help her with "just these few" --- you know how THAT works.

The next picture has turned out to be the inspiration for one of those things. A rustic ring pillow.

Sure, I can do something like this.


Source: etsy.com via Teresa on Pinterest

Well that "this" is 5 x 5 inches square. Yes I researched it and found the specs for the original

Then I cut and formed letters from grapevine. And I made this.


Well this is 8"x 5" and my sweet little bride thought is was too small. Lots of people have issues with real size interpretations.

So I regrouped and made this one - 8 x 8 this time. She loves this one.


I say all of that to say that the small one is now available for purchase. $12.00 for one rustic ring pillow.

Have a great day.


Friday, November 30, 2012

musical chairs????

This wedding is killing me ----

Not really ---

Nothing we have DIY'd has been hard to do. Tedious, yes. Time consuming, yes. Not difficult though. 
Thank goodness for PINTEREST. Communication between the Bride2Be has been somewhat easy. She pinned this
Source: etsy.com via Molly on Pinterest

It's pretty. But it really didn't go with what we are doing in her decor. 

But I happened up on some really random wood pieces. Actually some pieces of chairs - chair backs. 

I had the Father of the Bride paint one a really pale blue grey color. 

Then I took the wording from her pin and printed it on a really pretty iridescent piece of vellum.

Spray adhesive from Elmers glue. (I think I've mentioned that this is a favorite product)  and then some of that stunning embossed paper I bought early on in this wedding project. 


This sign goes on the guest sign in table. It was the last thing for this table completion.

I sent a picture to the Bride2Be.

She wanted "bling"

So I added the mate to the ring pillow earring to the corner.

Not too much but it does add just a little "oomph" to the sign.


Here is a close up of it --- I LURVE!!!!! this paper.


The moral of the story --- think outside the box. Play some musical chairs or whatever.

Yes --- if your wedding is to be vintage and in tones that this works with - it will be available afterwards.

Monday, October 29, 2012

I blame it on pinterest.

Look past the cute little heart suckers.

See the grungy work table. A scavenged piece from a throwaway pile. Dumpster diving monstrosity. Literally disintegrating. 


Now look -- the same table on my front porch - still a work table but with a nice new -AND ALSO FREE -- top. 

Crusty Old Guy has a friend who owns a cabinet shop. Cabinet lumber comes on some NICE pallets with plywood tops on them and he snagged several pallets and took them apart for the plywood. 

So a few screws some rounded edges and sanding and we have a nice solid tabletop. 


Here is where pinterest and my go to learning source Google step in. 

I made a fitted top for the table out of a flat white sheet. 

Then made side panels from some opaque white fabric. 

Then I started the whole stitching and cussing part. 

(Note - cute little reading glasses now required) 

There is no gathering foot attachment for my machine. But I learned a neat trick. Zigzag across dental floss to gather the tulle. If you hold the floss under tension, it kinda gathers itself. 

On the first one i was like "HEY HEY - this is waaay cool" 


I broke threads. And I cussed. I rethreaded the needle again and I cussed. Actually, I used up all of my cuss words for the weekend on this little project. 


As I gathered the tulle, I spread it out along the table top. I was trying to judge when enough was enough. 

Honestly after that second piece -- I had had enough.


Little did I know that the REAL fun was only beginning. And that I would need to "borrow" curse words from everyone's allocation.

I started adding this mountain to the edge of the table cloth along with the solid draped sides. 


After wrangling and using up several of those words, I managed to completely encase the table as needed. I then added beautiful lace top. 

It all fit and the look was like I wanted. 


For the next step, I drilled holes for cup hooks and screwed those in on three sides. Our table goes against the wall so there will be no need on the back. 


Flip the table back over and hang some icicle lights from the hooks. 

Add the now fitted tablecloth and lace topper and then turn the lights out and hope that there will not be the "Mom, I don't like it" look on the Bride-to-Be's face. 


Plug in those lights ------


I am such a happy girl.    

I think it it a reasonable duplication of this ....

Source: dogpile.com via Teresa on Pinterest


One lit party table --- rental. $75.00

ours -- table = free
fabric = sheet from the stash 
tulle = 10.00
lights = 6.00

curse words by mama --- absolutely no charge. 

so for 16.00 I own the table and the cloths. can use it as often as I want - loan it out or even rent it out my self. 


I'm going with this one being a real score.

There was a ton more completed this weekend ---

Til tomorrow.

Teresa


Monday, October 15, 2012

Failures --- and Fabulous Fakes

It's a do it yourself wedding --- actually it's almost a MOM DO IT HERSELF wedding. 
But anyway. 

She pinned this image ...... 


Source: etsy.com via Molly on Pinterest

And me, being a seasoned crafty person said "sure honey, we can do that". Then I went online and I chased and chased the how to stuff on these. I watch videos and read. 

I chased down the wire needed and already had the hangers from this project.

I sat down with cutters and pliers. I followed those directions from writing out a sample and sizing it like it needed to be. Then I tried twisting and writing with wire ----

And I tried.

And I tried. 

And I got up from it. 

And I came back to it. 

Well you know how sometimes they write curse words like ----- S*&^%( and 
D()&^$. 

Well people ...... 

These are WIRE CURSE WORDS. 


I gave up on writing it in one long piece and I tried again -- using individual letters..... 


These were soon added to the pile of wire curse words. 

Then I gave up and sent the text --- I CANNOT do this. We may just have to buy this one. 

I called a friend and lamented --- It's humbling to discover that there is something you cannot do. 

I called another friend who tried to encourage me and said take a break and come back to it. I said in that SUUUUPER sarcastic tone --- I HAVE ALREADY TRIED THAT - THIS DAMNED WIRE DID NOT EVEN WRITE ITSELF INTO A NAME. 

Then I gave up. Stomped off. And took the thinking cap off. (That would be the cap to the bottle of Corzo Tequila. Don't be alarmed, I made myself a small margarita, that's all)

And I pondered and suddenly an idea. 

She really wanted a hanger that said Mrs Larkins. 

I knew I could do this.


I also have a box of these Making Memories Script Letters. 


So I poked through the letters and spelled out the name. 

Wrapped the beads around the pants rail of the hanger. 

Drilled tiny pilot holes for some eye pins. 

Glued the eye pins in. 


I added the letters using jump rings.

Glued a tiny heart to the hanger (just below the hook) 

And ended up with a version of a MARRIED NAME HANGER that this DIY mom could do.

Maybe pinning this one will inspire some others. 

Have a great day. 

Just for the record -- "My name is Teresa and I discovered that I cannot write with wire" 


Thursday, October 04, 2012

starting here ---

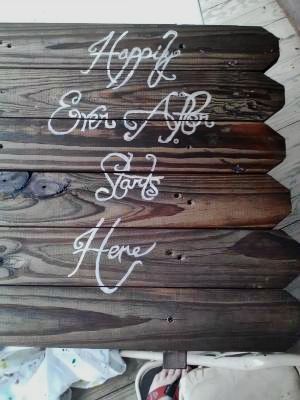
SHE PINNED THIS

I PINNED THIS
Source: etsy.com via Teresa on Pinterest


Well --- what are we going to do......

Her daddy was making signs. 

I had him make one just for this wording. 

Out of the pickets that were just laying around. 


Then there was digging around in the barns and sheds for a dark stain. And her daddy found some --- (I have no idea what color -- it was in the stuff stash) 

Left over night to dry ... 

On Sunday afternoon in the open air studio (the front porch) I used a silver fine point sharpie and an over head projector and laid the wording out. 

Then I took a paintbrush and some SILVER Painters Touch paint. I have sang praises about this paint before. 

I simply added width to the lines of the sharpie lettering.


After it was all lettered, I sent the picture above to the Bride-to-Be. 

She had no idea that it was not really complete.

She text back that the word "here" was out of alignment. 


What she did not know was that I had these metal script letters to add to the bottom and a really pretty heart made from some textured paper. 

Plus another little surprise.

A little something extra along the left side.


Do you guys like it? That border of the lace. I do and she does too. and by using those metal letters that can be removed if need be, the sign can be reused. 

Here's the cool part 

fencing (from the stash)
stain (from the stash)
silver paint (from the stash)
Letters and head pins (from the stash)
Lace (from the stash)
spray adhesive (from the stash) 
paper for the heart ( from the stash)

one more project done for FREE ------

Have a great afternoon.

Tuesday, October 02, 2012

IN THIS DIRECTION


The picture above is from pinterest. I pinned it, knowing that signs would be necessary --- and I do mean necessary.


Because we live in the outskirts of nowhere and this wedding is in the true middle of nowhere. Turn off the main road - side road -- then side road -- then this road turns to dirt --- that kind of middle of nowhere.

Well, I don't really have the woodworking skills to make these. But I am an expert in gathering things. A serious collector (HOARDER) of stuff and I just happened to have.


That short picket fencing leaned against the barn. The Father of the Bride brought that home when his good friend Megan moved away. So it got repurposed.


With me describing my ideas and him FINALLY understanding what I was saying, he took the pickets off  the stringer and aligned them close together.

Some with three boards - others with different counts.

Then over the weekend, I taped off the edges.

All the way around ----


Then broke out my chalkboard paint (left over from the desk project) Then I painted the signs with two coats of chalkboard paint.

Peel off the tape.....


And we have our version of chalkboard directional signs for the Wedding in the middle of nowhere.

Coolest part of this project.

FREE -------


Monday, September 24, 2012

Back to rest....


 We have a saying here at work ---- dang I'm glad it's Monday, I had to come back to work to rest.

Well this past weekend was one of those kinds of weekends.

A serious wedding work weekend.

I finished these ------- almost a hundred of them. It took Friday night work and ALL DAY Saturday but this little detail is done.

As I added the beads to the very last one, I proclaimed it to be MY FAVORITE ONE. Bride-to-Be and Future Groom were at the house watching the GA football game. She pops over to the table where I am working and says "why, it looks just like this one." 

My answer to that ---- IT'S THE LAST ONE. 

The one below is actually my very favorite one. The center is a Bridal Accent that I bought on clearance somewhere many years ago. I'm telling you guys I have pulled out the stops and am really using my good stuff for the wedding. 

Just in case anyone is interested there is a tutorial here for doing these. The steps I used were the exact same except I just cut my fabric into simple circles. And rather than a bucket of water - I just kept a really soaked kitchen towel on a plate on the table. 


How did I accomplish this finish?

Well the weather here in North Georgia is absolutely beautiful. Anyone who reads here regularly knows that I am a huge fan of fall. So early Saturday morning -- I took a blanket (made by my mom) and all the stuff for these to my "outdoor studio" space aka the front porch of my house.

I took this picture later in the day.


As I finished each flower I dropped it into the box and moved right along.


They all just look so pretty hanging out together. Many are similar, but many are definitely one of a kind. Thrifted buttons. Saved buttons. My Nanny's buttons. The Man's grandmother's buttons. Beads. Embellishments of all kinds.

Many Prayers for that girl and her soon to be hubby. Reflected in each stitch.


Saturday evening found me realizing I needed a gift for a shower.

It also found me completely unwilling to leave my house and go get something. So I decided cash was to be the gift. But how to give cash in a way to not make it look like I didn't take the time to shop.

By making it the beginning of a "Nest Egg".

I have several crochet nests that I have used for this type of gift in the past.

I took a library pocket and a shipping tag. Stamped the tag and added a lace pull.

Glue the cute little nest on some coordinating fall leaves. Add nest filler and  tiny bird to the pocket.

Tuck in the cash and we are good to go.

All from the stash.


The big flower project being finished, I now start the last HUGE (I REALLY ME HUGE) wedding production items.

We have this image pinned.


I own one of these and bought the Spellbinders heart dies. (smooth and scalloped sets)

Last night I started the process of punching the cardstock bases for some 600 of these hearts. Some on sticks and some not. I have ideas to use these all over the areas.


I punched 150 of the large scalloped ones from white cardstock. Tonight there is be more.


The Bride-to-Be and I attended the bridal shower for our friend Holly.

Every now and then I get a decent picture of myself. She, on the other hand, is always beautiful.


She was almost married with out her mom though. I went into my studio the gather up some fabric for a Sunday School Craft.

I found this in my studio fabric cubby. A 4 foot long snake shed. (I also found the snake this belongs to)

I am not afraid of the snake and my studio is an old barn, but I had let my guard down and he startled me.


It was a fantastic weekend.

Hope you guys had one too.